THE PROPOSAL
Kidish Proposal Presentation (PDF)
Goals:
1) Promote healthy eating
2) Provide Entertainment
3) Music, happy faces and fruits that response to touch
4) Protective - Color indicators regarding the temperature of the food
5) Most important fun!!
SOUND
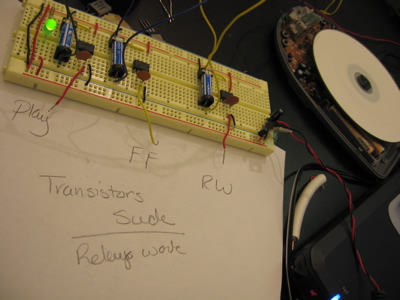
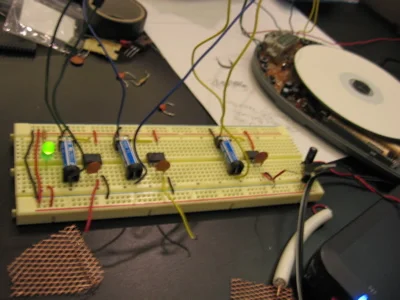
CD Hack: Took CD apart and identified buttons: play, stop, fast-forward, and rewind
Solder wires to cross points of each of the button. Solder a wire to the cross point of the reset button so it would not reset.
Original Concept: We wanted to control CD so when a person touched one of eight touch sensors the CD would skip designated track.
Recommendation was to use transistor as a switch to contact the buttons to the PIC.
On the PIC we would have had code that simulated pushing the skip button. The code would have been “If then” statements based on ranges. There would a have if then statements to address the possibility of being on any track and the FF button would have been “pushed” (high/low in the code) to skip to a particular track.
It was recommended we use the CD motor Lab as an example to follow for setting up the transistors.
TESTIMONIALS
Pollie: On my first attempts I could not get any response from the transistor. The LED would not light up.
Finally, with the help of Vincent, Nick and Una, I was able to debug my soldering and wiring of the board to get control of the play button.
Initially, as soon as I put the wires from the play button in the board the CD would power up and play. The transistor was acting as if automatically closed not open.
If I reverse the code and start on High and move to Low, then she could control the play button. Adding the touch sensor was not difficult; regaining control of the play button was a problem.
Then I worked on adding the FF button to begin trying to control tracks. However, whenever I hooked up the FF wires the CD would play as if one was holding down the FF button. I reversed and re-reversed the code and still could not get control. Then switch the wires in the plugs, tested solder joints, tried to control the program button instead. After several hours over days of this, I had to finally let go and just do relays.
Troubleshooting
So in the end, all I had were two relays to control the play and ff. Since the relay limited my control, I could only hookup one touch wire.
I tried testing with copper mesh wired but sensor was read multiple inputs and CD was go into fast forward play mode. The best I could come up with was one long wire with small cuts to allow for touch points.
I wanted to use white coaxial cable but there was not enough room in the dish, so I used the white thin wired from the cabinet. I wrapped it around the top of the dish to skip the CD.


Speakers:
1) Cut and remove from casing
2) Twist wires and tape together


MIDI
Original Concept: The left container of the dish would hold Q-touches for midi single note sounds. The MIDI tones would be an eight note scale. The tones could be "played" with the longer tunes being accessed by the CD player controlled by Q-touches on the right dish.
Troubleshooting
Pollie: Over the Thanksgiving weekend, Olivia and I were able to get the MIDI to play from multiple ports and respond to the q-touches. We worked on selecting notes for the MIDI frequency using the chart found on borg.com MIDI Note Number to Frequency Conversion Chart
Olivia worked on finalizing MIDI and had to wait for Q-Touch sensor to arrive to test multiple switches. She also worked on building a sample board to be the model to solder the perforated board.The MIDI stop responding to the Q-touch sensors,We eventually, realized the connections were on the wrong port. However, time had run out and MIDI had to be shelved.
Olivia: The MIDI stop responding to the Q-touch sensors, partly because that we borrowed sensors from different people and some of the sensors didn't function in certain ports.I should have tested them all with LEDs. It wasn't later in Sunday, when the same problem came out that I realized that it is not the circuit, but the sensor's problem.It works in the opposite way, and it did't respond to certain ports. Anyway, we found the way to use them well in our LEDs, just writing an opposite code.
Talk about our midi, I started wiring things up and getting midi to work one week before thanksgiving, things were going well when I worked with Pollie to further hooking up midi to touch sensor. It was out of my expectation when it stoped working on Saurday. Pollie suggested that it's because of something's wrong with the circuit, because we all have the impression that it's usually minor problems that influence the functionality. What's more tricky, the wrong port worked once in a while, without thinking too much, I was just crazy swiching wires, chips, and breadboards. Saturday night, I tried to switch from midi to freakout command, it doesn't worked well. It wasn't the next day that I found both the sensors and the ports are wrong.
Even though I found my stupid mistake early on Sunday, and even thought we already have everything ready to test and use it, because we already run out of time switching the circuit to perforated board, Pollie made a sensible decision to just drop the midi part and get our project done in time.
Overall, I'm glad to see at least the CD player working, and I finally learned the importance of controling every element that is involved.Thanks for everyone's effort.


TEMPERATURE
Thermistor
Research Resources regarding Children’s Health
Overweight and Obesity
Feeding Children Ages 2 to 5
Study: Toddlers eat too much junk food
Food Safety Facts
Preparing Food for a Crowd
Original Concept
Now that we had working ranges, I wanted to relate them to actual temperatures.
I researched proper cooking temperatures and food temperatures. While the temperature of the food is important regarding not wanting to burn the child’s mouth, bacteria is also a concern.
Perishable food should never be kept at temperatures between 40°F and 140°F for more than 2 hours. Bacteria can grow well at these temperatures and may grow to levels that could cause illness.
The idea was to have the light not only reflect the emptier of the food regarding pleasurable eating but also indicate when the food may no longer be safe to eat due to possible bacteria growth.
- Red light for food that is too hot to eat
- Blinks as it is cooling down
- Green light for food that is safe to eat.
- Blinks as temperature starts getting too cold
- Blue light when food reached temperature when bacteria begins growing
- Blinks when food as been at bacteria growth temperature for an hour
Troubleshooting
Pollie: Initially, during the week I got serial read out from the thermistors. By the weekend the serial read out stopped. Songul worked with the boards for several hours.
Songul: I also wired a new board and tried different resistors and switched to different computers and serial cables but couldn't get anything through serial. I programmed a new pic and used another set of thermistors but that did not work either. As the time run out we had to continue with rest of the project so I moved into other things such as building a stand for the dish and helping Olivia and Quanya to put boards into the dish. Below link are the codes that we used for testing and TRI Color LED temperature indicator through thermistors. The thermistors are from SparkFun.com - 10K Thermistor.
Pollie: As time ran out, I tried the thermistors again but at this time I could not get serial output from the board at all. I had others in the firmware look at the board and they could find nothing wrong. I was not able to get “Hello world” to come out. I wired a completely new out of the package board. Used a different serial cable, different computers, but to no avail.
In the end, thermistor had to be scraped due to lack of time and the fact we could not get a basic board working.
- Not serial output
- Wired multiple boards
- Multiple serial cables
- Multiple computers
- Multiple sensors
- Never could get a reading from the thermistors
- Temperature Basic Code (PDF)
- Temperature Tri-color LED Code (PDF)
DESIGN
Original Concept
The dish would have designed created by LEDs. The LEDs would react to touch and correspond with music being played.
LEDs Designs
Containers:
The left and right containers would each contain two fruit/Vegetable images and a face. Each fruit/vegetable image was designed show alternate showing two different images based on which leds were turned on.
- Apple/Watermelon
- Lemon/Banana
- Orange/Carrot
- Grapes/Strawberries
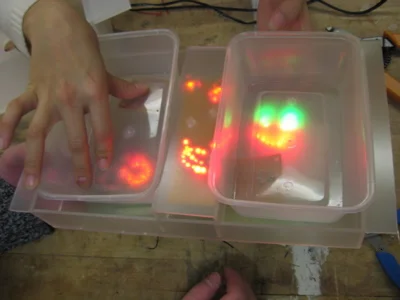
The Faces would also alternate between two types of expressions based on which LEDs were turned on.
- Happy Smile/Bright Eyes and Open mouth
- X designed face/ Happy lips Face
Divider
The Divider was to have a design of birds and a "singing face at the bottom." The singing face would have a mouth that appeared to open and close based which leds were on. The face would coordinate with the CD song play as if it was singing.
Testimonials
Quanya: I designed the face and nature panel and solder the board.
Troubleshooting
Quanya and Songul: We worked on the design of the images and soldering of the LEDs. The images worked individually but the matrix was too complicated to work successfully. Power should be enough, and the connection here is a more important concern.All ground cna power could be hooked up together to make a more effective circuit.
Quanya, Songul and Olivia: We worked on the code of the LEDs. We attached the LED panels to a Q-touch, which allowed the LEDs to light and blink when the dish was touched. Only problem we experienced is that Qprax works only on some part of the cports and most of the dports but not on aports. Below is the code that we used.
PIC code (PDF)


CONSTRUCTION
Materials
We considered plastic dish with metal containers at the beginning because we thought we would use a spoon to be a switch to activate the plate.
We took an afternoon and searched stores and thrift shops for metal containers that might work with our dish.
Then we realized that children eat with their hands and most baby spoons are plastic. Also any type of powered object would not be ideal from a parents prospective. Also we decide from an aesthetic point of view we liked keeping to one material.
We sat down as a group and designed out the size and housing of the dish. The one component we struggled over was how to make the dish so we could access the bottom where all the wires were located. We consider creating slot and notch system, where we could slide a middle shelf in and out, but that got tricky when considering all wires we wanted to place around the two containers.
We then came up with a the concept of the top container being a "mini" dish that could be lifted out. There would be hold in the middle for the wires to go for the divider design.
In the bottom of the dish the right side would house the CD player and a LED panel and the left would hold the boards and LED panel. The LED panels would stand on metal supports screwed in at the four corners.
A mock up was made and dimensions measured and printed out to take to Canal plastic to be cut.
Due to deadline and backup concern, we kept the stereotype of breadboard version on the day we presented.
- Frosted clear Plexiglas containers (Canal Plastic)
- Diagram of Container (PDF)
Children's Funtime Food Plate
A playground for feeding times

The final product had a CD player that responded to touch and would skip to a new track. LEDs that would light and blink when touched.